When you have a board in your hand but you don't know is it working or not, how to verify if it's working or dead?
-
3I would suggest that the title and question is either changed to be "Arduino Uno", or the tag "uno" is removed and the question made more generic.– CybergibbonsCommented Feb 13, 2014 at 9:34
-
See also arduino.stackexchange.com/a/13293/39212 for several more checks.– JethroCommented Jan 16, 2019 at 14:26
3 Answers
Note : After the @Ricardo's comment on my last post, I am posting this !
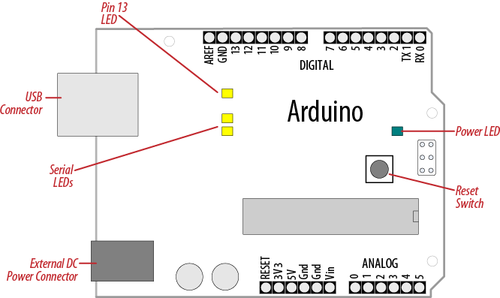
Plug the board into a USB port on your computer and check that the green LED power indicator on the board illuminates. Standard Arduino boards (Uno, Duemilanove, and Mega) have a green LED power indicator located near the reset switch.
An orange LED near the center of the board (labeled “Pin 13 LED” in the image below) should flash on and off when the board is powered up (boards come from the factory preloaded with software to flash the LED as a simple check that the board is working).

If the power LED does not illuminate when the board is connected to your computer, the board is probably not receiving power.
The flashing LED (connected to digital output pin 13) is being controlled by code running on the board (new boards are preloaded with the Blink example sketch). If the pin 13 LED is flashing, the sketch is running correctly, which means the chip on the board is working. If the green power LED is on but the pin 13 LED is not flashing, it could be that the factory code is not on the chip. If you are not using a standard board, it may not have a built-in LED on pin 13, so check the documentation for details of your board.
Online guides for getting started with Arduino are available at for Windows, for Mac OS X, and for Linux.
-
2Note: This will work only if the USB port or the FTDI chip have not been burnt. The Atmega chip could be functioning correctly even if these two components are not.– asheeshrCommented Feb 13, 2014 at 7:49
-
1+1 Right on, Hardik! Funny thing is that just yesterday someone asked a question about a problem with their Arduino and I wanted to point it to your answer. Now we can do it properly.– RicardoCommented Feb 13, 2014 at 11:16
-
-
2If you reset the board (with the button), the bootloader usually flashes the pin 13 LED Commented Feb 13, 2014 at 16:47
-
1My first board was a Duemilanove and came with a dead FTDI chip. Was very frustrating until I got a working replacement board. Commented Sep 17, 2015 at 20:04
Supposed one owns a USB programmer, there's another way to inspect the Arduino.
Connect the programmer to the ICSP pins of the Arduino and call avrdude with the right parameters to read the fuses of your Arduino.
avrdude -c programmer-id -p partno -P port
For an Arduino Uno, partno is m328p. Programmer-id depends on the device used. In my case (mySmartUSB light) stk500v2 is a supported and port is /dev/ttyUSB0. Here
avrdude -c stk500v2 -p m328p -P /dev/ttyUSB0
gives the following output
avrdude: AVR device initialized and ready to accept instructions
Reading | ################################################## | 100% 0.01s
avrdude: Device signature = 0x1e950f
avrdude: safemode: Fuses OK
avrdude done.  Thank you.
The UNO board responds with the correct signature and is ready for some action :)
How to connect?
My USB programmer came with a 6-wire ribbon cable with 2x3 female connectors on both sides. As usual, the wire for pin 1 is marked red. Due to a notch in at the 2x3 male connector of the programmer, the cable only fits here in one direction.
If you look at the Arduino UNO, the ICSP header is to the right of the reset button.
The pinout is as follows.
MISO  1    2 VCC
SCK   3    4 MOSI
RESET 5    6 GND
NOTE Pin 1 is the top left one, marked with a white dot!
-
2
-
@Cybergibbons Absolutely true! But even with a fried USB, there might still be a chance to flash the Arduino using the programmer then ;) Commented Feb 13, 2014 at 9:45
-
+1 Good to know! Will put my 3 dead ATmegas through this test. Do you know how to check the fuses using an Arduino UNO as a programmer, with the ArduinoISP sketch loaded?– RicardoCommented Feb 13, 2014 at 11:32
If you have another, working, Uno, and both have socketed microcontroller chips, you could use the known board to program a test sketch onto the unknown board's chip, put it back on the unknown board, and run it.
I like the following (pseudo-coded) test sketch for quick-checking my hand-built boards; it's just as handy for testing an unknown factory-built one. It's not an exhaustive test, it just checks for basic digital I/O, serial I/O, and shorts or opens:
forever,
  for each digital I/O pin:
    write high;
    delay 100ms;
    write low;
  end;

  write "Hello, World!\n" to serial output;
  while serial character available,
    write character to serial output;
  end;
  write "\n" to the serial output;
end;
A test LED - an LED with its resistor soldered to it - connected between any I/O and ground should blink every 2 seconds. If it doesn't, that pin may have failed or have a bad connection.
Two test LEDs connected to numerically adjacent pins (they may not be physically next to one another) should blink in sequence. If they blink together, it indicates a short, probably a solder bridge, between them.
The terminal should say "Hello World!" every two seconds. If not, that pin or the FTDI cable or on-board USB/Serial chip may have failed.
Type something on the keyboard and it should be repeated back to the serial terminal (if the previous test passed). If not, again that pin or the FTDI cable or on-board USB/Serial chip may have failed.
