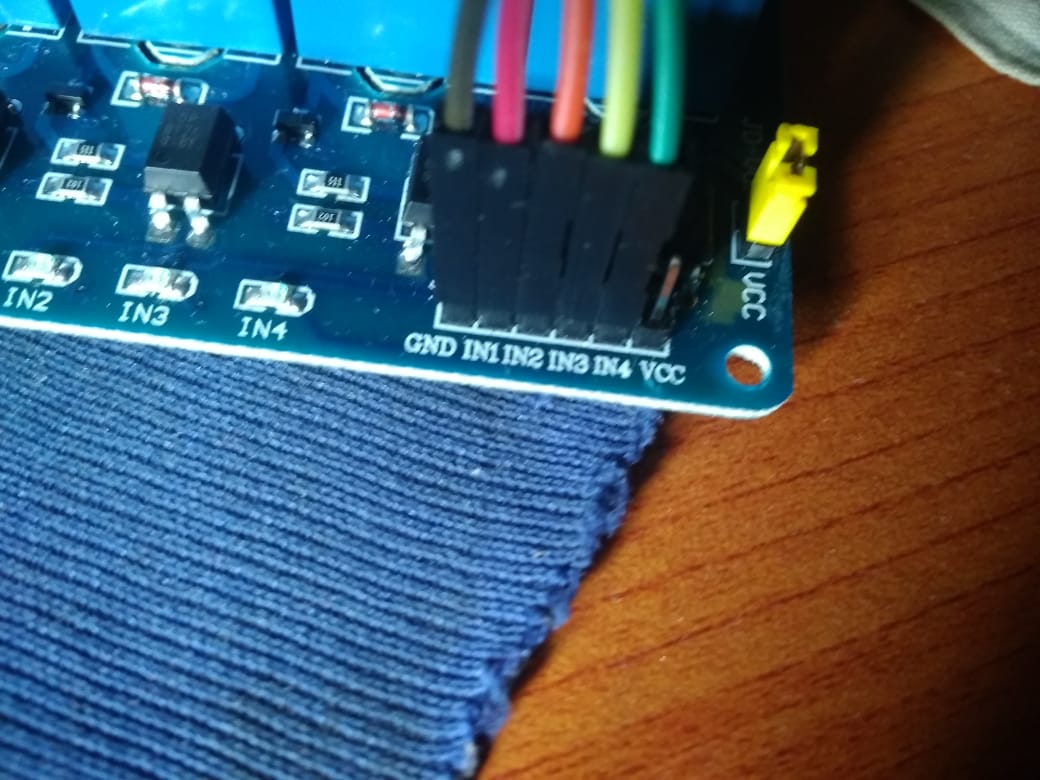
This is the relay board
I am using nodemcu to make a home automation project which is controlled by google assistant. This is the code i am using is this one
#include <ESP8266WiFi.h>
#include "Adafruit_MQTT.h"
#include "Adafruit_MQTT_Client.h"

#define Relay1            D0
#define Relay2            D1
#define Relay3            D2
#define Relay4            D3

#define WLAN_SSID       "Subhodip"             // Your SSID
#define WLAN_PASS       "09003244135"        // Your password

/************************* Adafruit.io Setup *********************************/

#define AIO_SERVER      "io.adafruit.com"
#define AIO_SERVERPORT  1883                   // use 8883 for SSL
#define AIO_USERNAME    "SubhodipRoy"            // Replace it with your username
#define AIO_KEY         "50a98bb44f6b48b69e645badadf8fb577894"   // Replace with your Project Auth Key

/************ Global State (you don't need to change this!) ******************/

// Create an ESP8266 WiFiClient class to connect to the MQTT server.
WiFiClient client;
// or... use WiFiFlientSecure for SSL
//WiFiClientSecure client;

// Setup the MQTT client class by passing in the WiFi client and MQTT server and login details.
Adafruit_MQTT_Client mqtt(&client, AIO_SERVER, AIO_SERVERPORT, AIO_USERNAME, AIO_KEY);

/****************************** Feeds ***************************************/

// Setup a feed called 'onoff' for subscribing to changes.
Adafruit_MQTT_Subscribe Light1 = Adafruit_MQTT_Subscribe(&mqtt, AIO_USERNAME"/feeds/Relay1"); // FeedName
Adafruit_MQTT_Subscribe Light2 = Adafruit_MQTT_Subscribe(&mqtt, AIO_USERNAME "/feeds/Relay2");
Adafruit_MQTT_Subscribe Light3 = Adafruit_MQTT_Subscribe(&mqtt, AIO_USERNAME "/feeds/Relay3");
Adafruit_MQTT_Subscribe Light4 = Adafruit_MQTT_Subscribe(&mqtt, AIO_USERNAME "/feeds/Relay4");

void MQTT_connect();

void setup() {
  Serial.begin(115200);

  pinMode(Relay1, OUTPUT);
  pinMode(Relay2, OUTPUT);
  pinMode(Relay3, OUTPUT);
  pinMode(Relay4, OUTPUT);

  // Connect to WiFi access point.
  Serial.println(); Serial.println();
  Serial.print("Connecting to ");
  Serial.println(WLAN_SSID);

  WiFi.begin(WLAN_SSID, WLAN_PASS);
  while (WiFi.status() != WL_CONNECTED) {
    delay(500);
    Serial.print(".");
  }
  Serial.println();

  Serial.println("WiFi connected");
  Serial.println("IP address: ");
  Serial.println(WiFi.localIP());


  // Setup MQTT subscription for onoff feed.
  mqtt.subscribe(&Light1);
  mqtt.subscribe(&Light3);
  mqtt.subscribe(&Light2);
  mqtt.subscribe(&Light4);
}

void loop() {

  MQTT_connect();

  Adafruit_MQTT_Subscribe *subscription;
  while ((subscription = mqtt.readSubscription(20000))) {
    if (subscription == &Light1) {
      Serial.print(F("Got: "));
      Serial.println((char *)Light1.lastread);
      int Light1_State = atoi((char *)Light1.lastread);
      digitalWrite(Relay1, Light1_State);

    }
    if (subscription == &Light2) {
      Serial.print(F("Got: "));
      Serial.println((char *)Light2.lastread);
      int Light2_State = atoi((char *)Light2.lastread);
      digitalWrite(Relay2, Light2_State);
    }
    if (subscription == &Light3) {
      Serial.print(F("Got: "));
      Serial.println((char *)Light3.lastread);
      int Light3_State = atoi((char *)Light3.lastread);
      digitalWrite(Relay3, Light3_State);
    }
    if (subscription == &Light4) {
      Serial.print(F("Got: "));
      Serial.println((char *)Light4.lastread);
      int Light4_State = atoi((char *)Light4.lastread);
      digitalWrite(Relay4, Light4_State);

    }
  }


}

void MQTT_connect() {
  int8_t ret;

  // Stop if already connected.
  if (mqtt.connected()) {
    return;
  }

  Serial.print("Connecting to MQTT... ");

  uint8_t retries = 3;

  while ((ret = mqtt.connect()) != 0) { // connect will return 0 for connected
    Serial.println(mqtt.connectErrorString(ret));
    Serial.println("Retrying MQTT connection in 5 seconds...");
    mqtt.disconnect();
    delay(5000);  // wait 5 seconds
    retries--;
    if (retries == 0) {
      // basically die and wait for WDT to reset me
      while (1);
    }
  }
  Serial.println("MQTT Connected!");

}
Connecting the pins as stated below
VIN-->VCC D0--> IN1 D1--> IN2 D2-->IN3 D3-->IN4 Gnd-->Gnd
But only IN2,IN3 and IN4 led of relay board are only glowing the IN1 is not glowing and the relays are not switching on/off...
Anyone please help....
Please give any solution... Why the relays are not switch-on?
Please reply as soon as possible... I am very disturbed... Even cant sleep at night....
