0

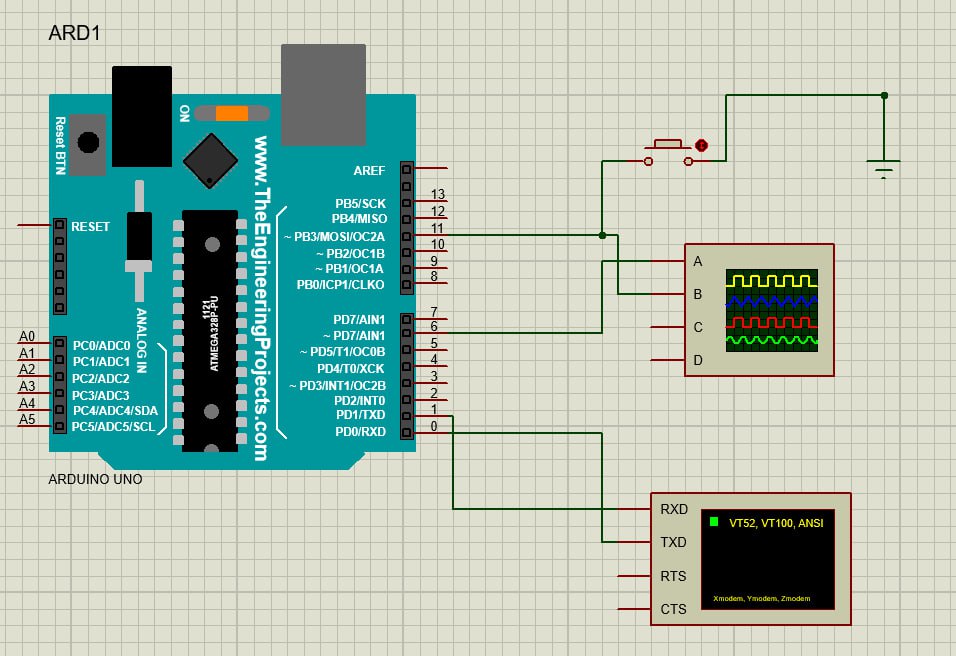
Implement interrupt processing when the button is pressed, and the very start on the rising edge, the interrupt pin and to which the button is connected 11. Why does the interrupt not work after pressing the button?

#include <PinChangeInterrupt.h>

const uint8_t buttonPin = 11;
volatile bool buttonPressed = false;

void setup() {
  pinMode(buttonPin, INPUT_PULLUP);
  attachPCINT(buttonPin, buttonISR, RISING);
  Serial.begin(9600);
}

void loop() {
  if (buttonPressed) {
    Serial.println("Button pressed!");
    buttonPressed = false;
  }
}

void buttonISR() {
  buttonPressed = true;
}

Model: enter image description here

13
  • The termination on the oscilloscope may be enough to pull down Pin 11. Consider removing the oscilloscope from Pin 11 and repeating the test. If that works, I'll create an answer with more details and things to try.
    – st2000
    Commented Apr 21, 2023 at 11:57
  • Removed the oscilloscope from pin 11, still does not work
    – Good York
    Commented Apr 21, 2023 at 12:05
  • Have you tried attachInterrupt instead? reference.arduino.cc/reference/en/language/functions/… note the use of digitalPinToInterrupt and that only certain pins on each model can be used as such. If it works, likely a bug in your PinChangeInterrupt.h or what it ties to.
    – Abel
    Commented Apr 21, 2023 at 12:13
  • I tried attachInterrupt(digitalPinToInterrupt(buttonPin), buttonISR, FALLING) also does not work
    – Good York
    Commented Apr 21, 2023 at 12:20
  • See reference.arduino.cc/reference/en/language/functions/… Note that GPIO 11 does NOT appear in the column of the table listing pins that can be used to generate interrupts (except for nano 33 IOT, Zero and the 101) - suggest you use 2 or 3. If you want an interrupt on the RISING edge, use a PULL DOWN resistor. seeedstudio.com/blog/2020/02/21/… that way pressing the button, rather than releasing the button produces the int. Finally, acknowledge that the button will bounce.
    – DrG
    Commented Apr 21, 2023 at 13:33

1 Answer 1

2

I just tested proper code with some changes:

#include <PinChangeInterrupt.h>

const uint8_t buttonPin = 11;

volatile bool buttonPressed = false;

void buttonISR() {
  buttonPressed = true;
}


void loop() {
  if (buttonPressed) {
    delay(20);
    buttonPressed = false;

    digitalWrite(LED_BUILTIN, !digitalRead(LED_BUILTIN));
  }
}

void setup() {
  pinMode(buttonPin, INPUT_PULLUP);
  attachPCINT(digitalPinToPCINT(buttonPin), buttonISR, RISING);

  pinMode(LED_BUILTIN, OUTPUT);
}

And with attachPCINT(digitalPinToPCINT(buttonPin), buttonISR, RISING); it works flawlessly. Only difference is that digitalPinToPCINT (as every example for PinChangeInterrupt library tries to suggest).

You also tried attachInterrupt + digitalPinToInterrupt with the pin 11, but Arduino Uno has only two external interrupt capable pins D2 and D3. So it couldn't work with D11. It also depends on MCU (see attachInterrupt() reference).

The PCINT is more or less related to the old AVRs like Atmega328 or Atmega2560. And PCINT in Atmega2560 isn't available on all port (it uses ISR per port and it has many ports.

If the proteus simulator is the cause, you can also ommit the ISR (as you are not doing anything big here) and just poll the pin:

const uint8_t buttonPin = 11;
bool buttonPressed = false;

void loop() {
  bool pinHigh = (digitalRead(buttonPin) == HIGH);

  if (pinHigh && buttonPressed) { // button released
    delay(20);
    buttonPressed = false;
    digitalWrite(LED_BUILTIN, !digitalRead(LED_BUILTIN));
  } else if (!pinHigh && !buttonPressed) {
    buttonPressed = true;
  }
}

void setup() {
  pinMode(buttonPin, INPUT_PULLUP);
  pinMode(LED_BUILTIN, OUTPUT);
}
14
  • Just to amplify on this, digitalPinToInterrupt is for pins D2 and D3 on the Uno (this function returns 0 or 1 respectively) when used with attachInterrupt, however digitalPinToPCINT is for the Pin Change interrupts, which the OP is using.
    – Nick Gammon
    Commented Apr 22, 2023 at 5:15
  • Why doesn't work for me, I use arduino uno
    – Good York
    Commented Apr 22, 2023 at 6:25
  • @GoodYork you have to change: attachPCINT(buttonPin, buttonISR, RISING); to attachPCINT(digitalPinToPCINT(buttonPin), buttonISR, RISING); or just try to use my code (It's toggling onboard LED - it has really simple debouncing too)
    – KIIV
    Commented Apr 22, 2023 at 6:28
  • 1
    I only have the model that is already attached to the question - if you have an emulator then you don't even have that. I read the question and saw that you claimed you were using an Arduino Uno.
    – Nick Gammon
    Commented Apr 22, 2023 at 6:45
  • 1
    @KIIV the task is as follows: The button must be connected to the corresponding pin interrupt PCINT3 - they have a task, which is to use PCINT3. The task isn't to solve any real-world problem.
    – Nick Gammon
    Commented Apr 22, 2023 at 10:36

Your Answer

By clicking “Post Your Answer”, you agree to our terms of service and acknowledge you have read our privacy policy.

Not the answer you're looking for? Browse other questions tagged or ask your own question.