1

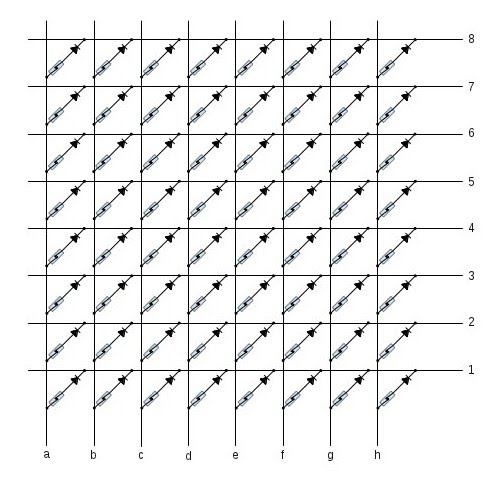
I am designing 8*8 reed switch matrix which will be connected to Arduino. I am using Arduino Duemilanove. I have completed the matrix portion but don't know how to connect and where to connect the other elements. My Matrix circuit

I decided to use the following items:

  • Arduino (Duemilanove)
  • 64x Reed Switch
  • 64x Diode (1N4148)
  • 20x Resistors (10K)
  • 1x 74HC595
  • 1x 74HC165

I don't know where to place the Resistors and shift Registers and connection from shift registers to arduino. I need help in the circuit diagram. Please help me out with the circuit diagram.

Reference: https://mtifall10.wordpress.com/2010/12/10/magnetic-sensing-chessboard/

4
  • 1
    The linked "full photo set" from your article appears to show exactly how the switches and diodes are arranged. Did you not look at the photos? Is there something about them that you don't understand? Otherwise, your question seems very strange since you have cited a reference that appears to provide a complete answer. Commented Dec 2, 2016 at 6:45
  • I have completed the circuit of switches and diodes connection. I have mentioned in the last paragraph that I need help in the connection of shift registers and resistors whose circuit diagram is not given in the reference and that is where I am stuck.
    – Kunal Sinha
    Commented Dec 2, 2016 at 8:10
  • How will the various pieces be recognised by Arduino? Top-down may be a better design approach in this case. In choosing reed switches you are constrained from the outset.
    – Chu
    Commented Dec 3, 2016 at 8:43
  • You know which pieces are where when the game starts. You track which one is removed from the board and where it is replaced. This way, you know where the pieces are without having to identify them. You must also have the Arduino sound a warning and refuse to play any more if more than one piece is ever off the board at one time during a move. It also has to recognize when a piece must be removed from the board (captured) and not throw a fit then.
    – JRE
    Commented Dec 3, 2016 at 9:14

2 Answers 2

2

This answer is based on a previous version of the question

  1. Not necessarily. You can use the internal pullups of the arduino if you're willing to accept that reading a "1" means that no piece is there and reading a "0" means a piece is there.

  2. Connect each wire up to a pin on the arduino. If you do it wisely, step 3 becomes fairly easy.

  3. You need to configure the pins connected to the letter wires as inputs with their pullups enabled. Set the number pins to inputs as well, but without the pullup enabled so that they are floating. The number pins will be each set as an output in sequence with the value being low (non-active number pins are set back to inputs). As you do so, you can read the pins on the letter wires and build a picture of the board.

Example

This is how I would do it just taking a naive stab at it. I'm sure there are more effective ways to do this.

Wiring:

Wiring

Configure the outputs and inputs in setup:

pinMode(2, INPUT_PULLUP);
pinMode(3, INPUT_PULLUP);
pinMode(4, INPUT_PULLUP);
pinMode(5, INPUT_PULLUP);
pinMode(6, INPUT_PULLUP);
pinMode(7, INPUT_PULLUP);
pinMode(8, INPUT_PULLUP);
pinMode(9, INPUT_PULLUP);
pinMode(10, INPUT);
pinMode(11, INPUT);
pinMode(12, INPUT);
pinMode(13, INPUT);
pinMode(14, INPUT); //A0
pinMode(15, INPUT); //A1
pinMode(16, INPUT); //A2
pinMode(17, INPUT); //A3
pinMode(18, INPUT); //A4

Make a function to scan the rows into an array of bytes:

void scan_rows(uint8_t *rows)
{
    uint8_t i, j;

    for (i = 0; i < 8; i++)
    {
        if (i)
        {
            pinMode(i+9, INPUT);
        }
        pinMode(i+10, OUTPUT);
        digitalWrite(i+10, LOW);
        for (j = 2; j <= 9; j++)
        {
            rows[i] <<= 1;
            if (digitalRead(j))
                rows[i] |= 1;
        }
    }
    pinMode(18, INPUT);
}

Now, just call that function with a pointer to an array with 8 bytes in it whenever you need to scan the board. Each byte in the array represents one of the rows and each bit represents a column.

[moderator note: This answer appears in this thread as a result of a merge]
0
1

Use 16 digital i/o pins on the Arduino. The ones connected to a-h should be configured as OUTPUT pins. The ones connected to 1-8 should be configured as INPUT pins. Start with all of the outputs (a-h) low.

You check for a closed switch at the lower left corner by making the output pin connected to 'a' HIGH then look at the value of the input pin connected to '1'. If it's high then that switch is closed. If it's low then that switch is open.

While the 'a' output is HIGH you can check the rest of the left column by looking at inputs '2' through '8'.

I don't see any need for the resistors or shift registers, but maybe your teacher had something in mind.

EDIT: I see that by using the shift registers you need only one INPUT pin and one OUTPUT pin on the Arduino. I'll leave that for you to figure out as I think I've given enough to get you started.

Your Answer

By clicking “Post Your Answer”, you agree to our terms of service and acknowledge you have read our privacy policy.