1

I have developed an Arduino program that plays a WAV file from the SD card using a speaker.

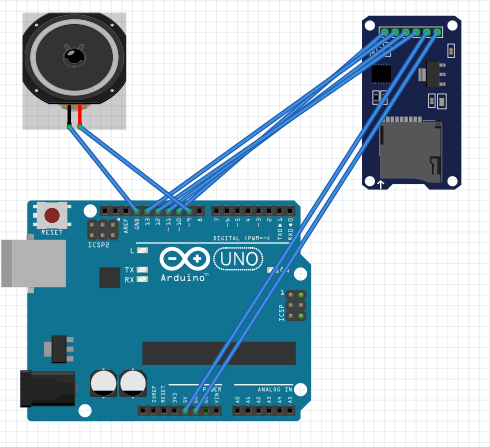
This is the circuit schematic

enter image description here

The sketch I'm using is based on TMRpcm library and PWM output

#include <TMRpcm.h>
#include <SD.h>
#include <SPI.h>
int sdpin=10;
TMRpcm tmrpcm;


void setup()
{
    Serial.begin(9600);
    pinMode(sdpin, OUTPUT);
    tmrpcm.speakerPin=9;
    tmrpcm.setVolume(3);
    SD.begin();
}

void loop()
{
    if(Serial.available()>0)
    {
        String data=Serial.readString();
        if(data=="pause")
        {
            if(tmrpcm.isPlaying()==1)
            {
                tmrpcm.pause();
            }
        }
        else if(data=="stop")
        {
            if(tmrpcm.isPlaying()==1)
            {
                tmrpcm.stopPlayback();
            }
        }
        else
        {
            String path="/Music/"+data;
            if(tmrpcm.isPlaying()==1)
            {
                tmrpcm.stopPlayback();
            }
            tmrpcm.play(path.c_str());
        }
    }
} 

At first I could play the music with the speaker but then it stopped working and because I don't have enough skill to make one myself, I would like to know if I can use a buzzer for that.

I know that buzzers can be used to generate melody using the tone() function but I'm not sure if I can use them to play wav files using PWM output.

Any help will be appreciated.

2
  • I don't have enough skill to make one myself ... skill to make what? .... the speaker stopped working probably because the output pin on the Arduino blew out
    – jsotola
    Commented Sep 19, 2018 at 5:00
  • you forgot to ask a question
    – jsotola
    Commented Sep 19, 2018 at 5:01

2 Answers 2

3

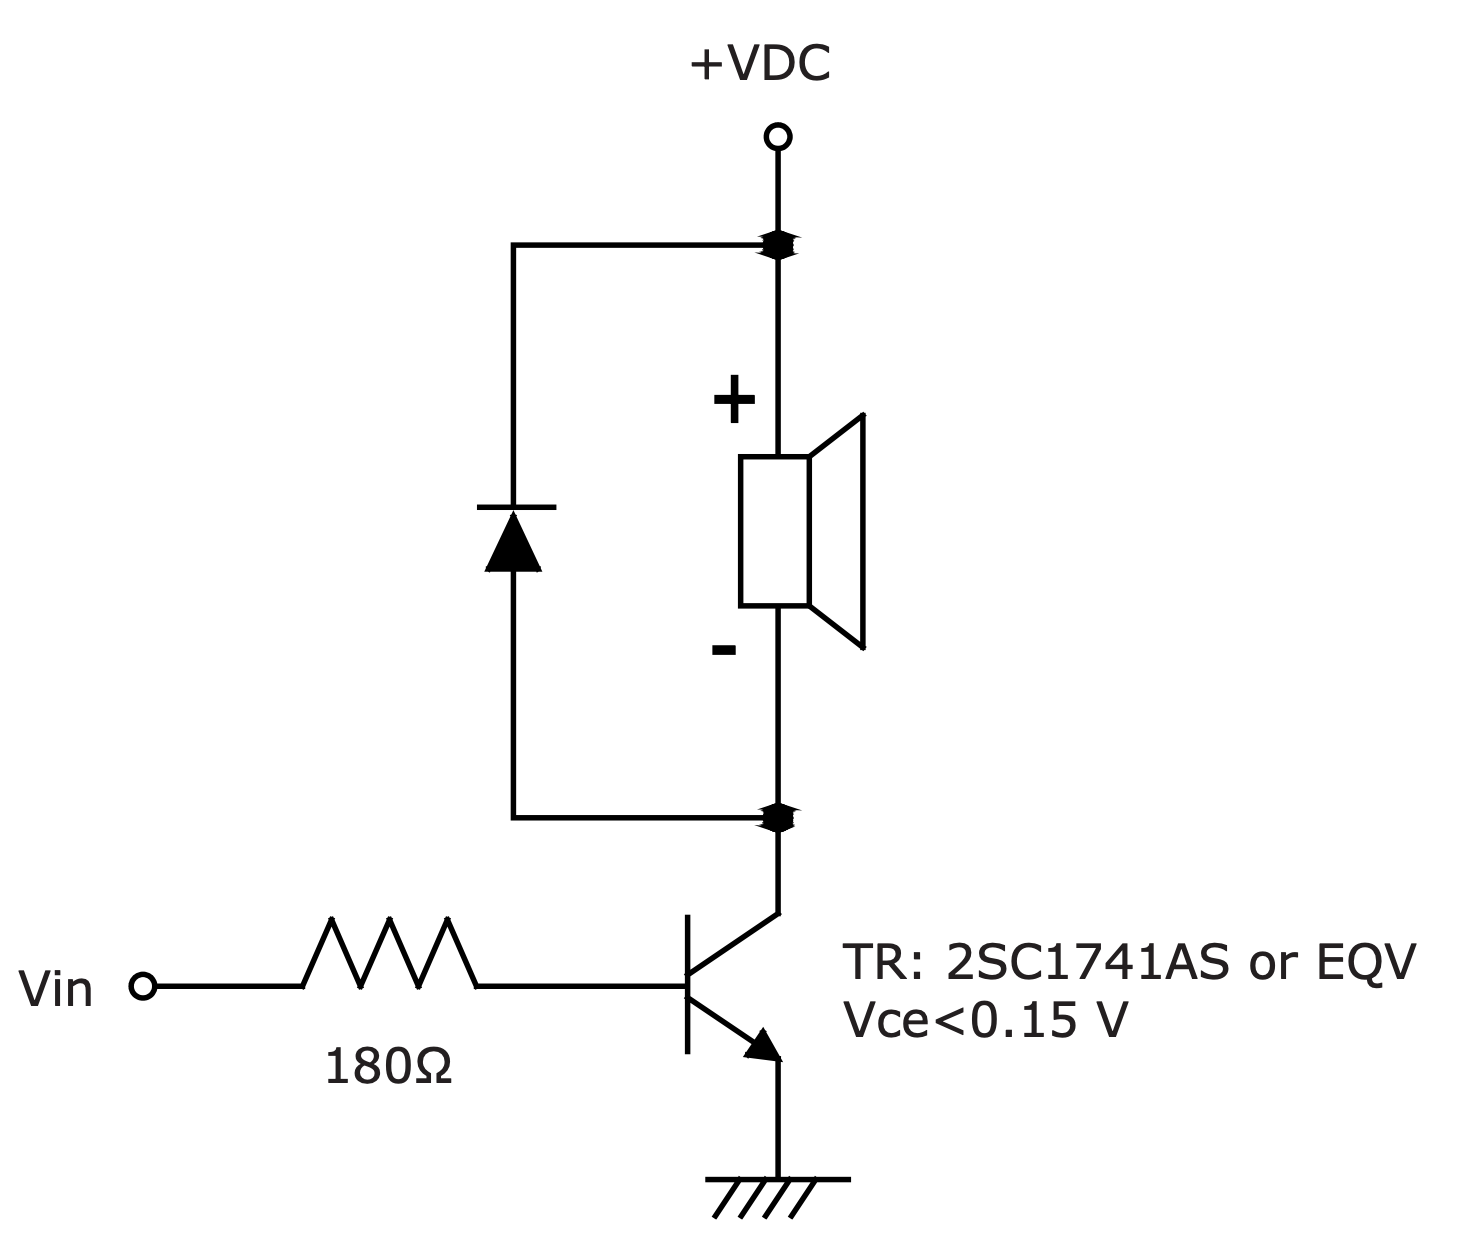
When driving a passive buzzer, you should always have the signal output from the Arduino go to a transistor tied between the ground and the (-) negative side of the buzzer. Also, if you use a regular NPN transistor, you should also have a small resistor between the Arduino and the transistor base.

buzzer driver circuit

The transistor is providing two functions; it's potentially amplifying the signal (if the (+) positive side of the buzzer is at a higher voltage than the Arduino) and it's also isolating (partially) that voltage from the Arduino. This helps save pins!

The resistor is to limit the current going through the transistor and helps keep both your Arduino and the transistor healthy. Voltage thrills, current kills and resistors limit current. If you use a MOSFET you want to change this from a low-ohm series resistor to a high-ohm pull-down resistor -- 4.75K or 10K is fine. A MOSFET is much higher impedance than an NPN transistor and should not be left floating.

Additionally, you want to add a diode between the (+) and (-) terminals on the buzzer. This may be the most important part of the circuit! When oscillating, the buzzer (whether magnetic or piezo) acts like an inductor and will accumulate a charge over time. This will be heard as a slowly diminishing volume from the buzzer. This charge will eventually overcome the protection diodes built into the GPIO pin (or any transistor) and destroy it! The diode blocks that charge loop and saves your chips.

1

There are different kinds of buzzers. The simplest one is just a piezoelectric transducer in a plastic casing. You can drive it directly by an arduino pin since its impedance is high. It will work fairly well for high frequencies, but don't expect any bass from it.

Another type of buzzer is a piezoelectric transducer connected to a simple oscillator circuit that will generate a waveform with a frequency typically between 1 and 4 kHz. This type of buzzer most likely won't work since the signal produced by your Arduino will be used to power the oscillator circuit rather than drive the piezoelectric transducer.

Please note that the pin you used to drive the speaker is possibly no longer operational. The impedance of the speaker was likely low enough to draw more current than what the pin of the microcontroller is rated for which probably caused damage to it. A non-piezoelectric speaker should never be connected to an Arduino without an amplifier in between.

Your Answer

By clicking “Post Your Answer”, you agree to our terms of service and acknowledge you have read our privacy policy.

Not the answer you're looking for? Browse other questions tagged or ask your own question.